
# Donations
# Coordinators and Representatives
# Adding a New Donation
# The Steps
In the Tutorial Video above you will be shown how to enter a New Donation to the Auction through the Supporter's Page. You are also able to add a new donation through the Donation's Page. The different steps between the two will be listed at the end of this section.
From the Main Page, select the MANAGE menu then click on the SUPPORTERS option. This will bring you to the Supporter's Page.
Start by clicking inside the box labeled Search and begin typing the Supporter's Name. After typing the first four letters you will see all Supporters with those letters. If the Supporter does not show up, please refer to the Training Video(s) on Adding a New Supporter before proceeding with the new donation.
Once you have found the correct Supporter, click on the MAKE DONATION button to the right of their name. This will bring you to the Create Donation page.
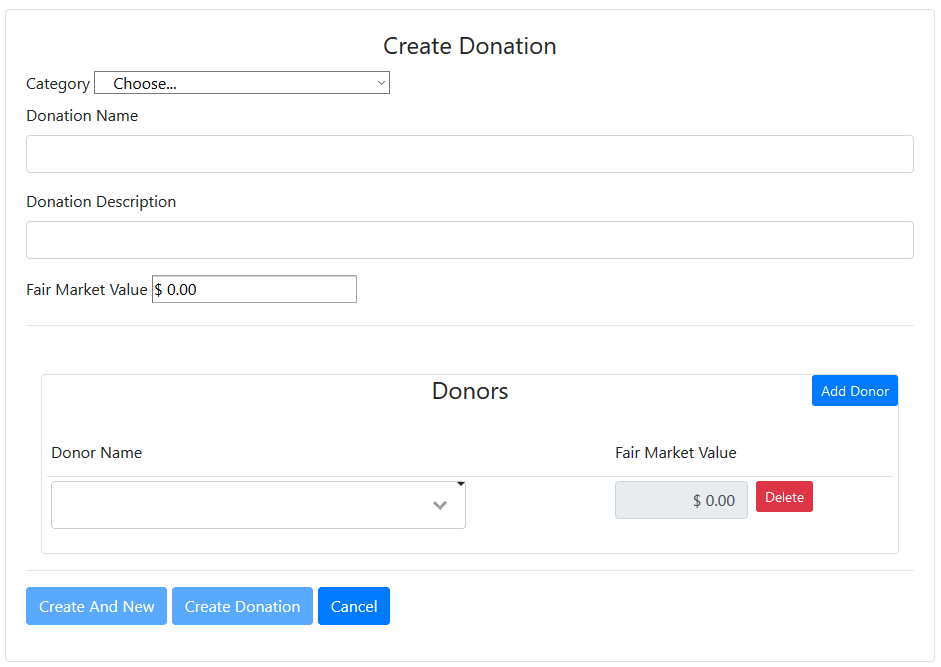
The next step is to click on the drop down menu labeled Category and select the category that the donated item fits into. In the tutorial video a lawn mower was added, so the category chosen was Lawn and Garden. Choose the most appropriate category for the item if it could fit into more than one, or check with your Auction Administrator.
After selecting the category, you can either press the TAB key to move to the next entry box or click in the entry box labeled Donation Name. Here you will type a brief description of the donated item. In the tutorial video, the donated item was a lawn mower, so the Donation Name would be Lawn Mower.

Then press the TAB key or click in the entry box labeled Donation Description. Here you will type a much more detailed description of the item. In the tutorial video, since a lawn mower was used as the example, you might type the Brand of mower donated as well as the model number and any features that need to be known. Once you are done typing in the description, you have the option to click on the USE SUGGESTION button. Clicking on this button modifies your entry by capitalizing keywords. This is done to make the entries more consistent in the Auction Book. It is optional.
TIP
If you clicked on the USE SUGGESTION button, you will need to then click in the entry box labeled Fair Market Value. If you did not click on the button, you can press the TAB key twice to get to the Fair Market Value box.
Once you are at the Fair Market Value entry box, type in the value of the donated item.
IF the Supporter is donating more than one identical item, you would press TAB or click inside the entry box labeled Optional Copies Available. You can then either use the UP ARROW on the keyboard or click on the small arrows on the side of the box to increase the number of copies.
WARNING
Please note that this is for ADDITIONAL COPIES ONLY. If the supporter is only donating a single unique item, the number in this box should remain at 0.
The final step is to click one of two buttons. If the Supporter is donating another unique item, click on the CREATE AND NEW button. This will add the current item to the auction database and clear the page for the entry of the next item. If this item is the last or only item, you will click on the CREATE DONATION button. This will add the current item to the auction database and take you back to the Support's Page.
Once back on the Supporter's Page you can search for you next Supporter to enter their donation.
# From the Donation Screen
You are also able to add donations from the Donations Page. You would navigate there by clicking on the Auction Setup menu the clicking the Donations option. This will bring you to the Donations Page and a list of all current donations.
To add a new donation from this page, you would first click on the NEW DONATION button. This will bring you to the Create Donation entry page. The main steps to adding a new donation are the same as if you added it from the Supporter's Page with a few exceptions.
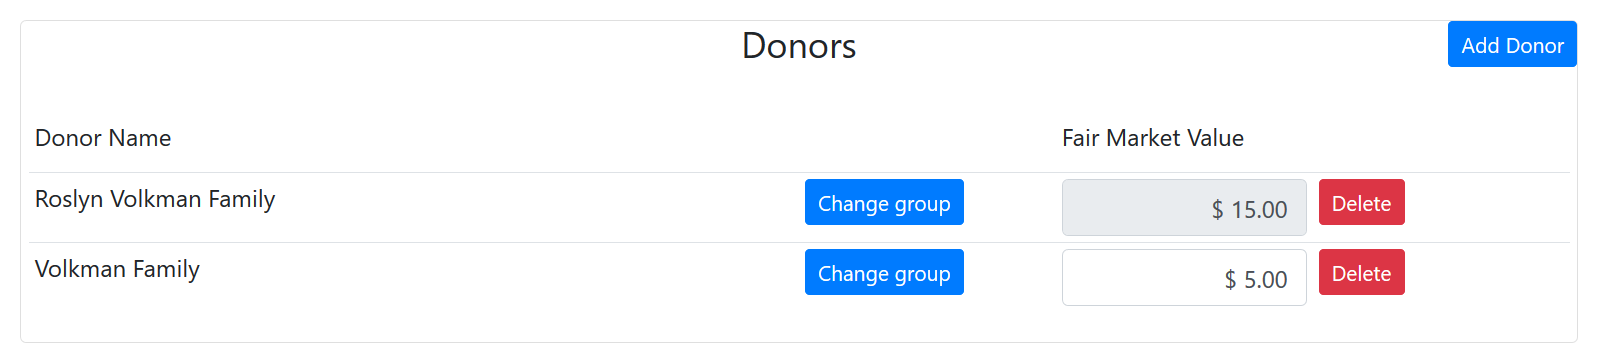
Once you have selected the Category, added the Donation Name, the Donation Description, Fair Market Value and any Optional Copies; you will then need to add the Donors of the donated item.
Start by clicking inside the Donor Name entry box and begin to type the Donor's Name. After typing the first four letters you will see all Supporters with those letters. Select the correct donor. You will also notice that there is an additional box labeled Fair Market Value. This is used if there are more than one Supporter donating the item.

Add each additional Donor by clicking on the ADD DONOR button. This adds an additional entry box. As before, start typing the additional Supporter's name and then select the correct Supporter. Next you will either press the TAB key or cick in the Fair Market Value entry box and enter the amount of their portion of the donation. You will notice that as you type in the amount, the Primary Supporter's Fair Market Value will decrease.
TIP
The Primary Supporter's Fair Market Value will be the Total Value of the item minus the value of each additional Donor's portion.
After adding the additional Donors, you will finish adding the new donation by clicking on the CREATE AND NEW button to add the item and clear the entry fields in order to add another new donation. Or click the CREATE DONATION button to add the item and navigate back to the Donations Page and the list of all the donations.
# Coordinators
As a Coordinator you might also be tasked with editing donations and adding new categories.
# Editing a Donation

# The Steps
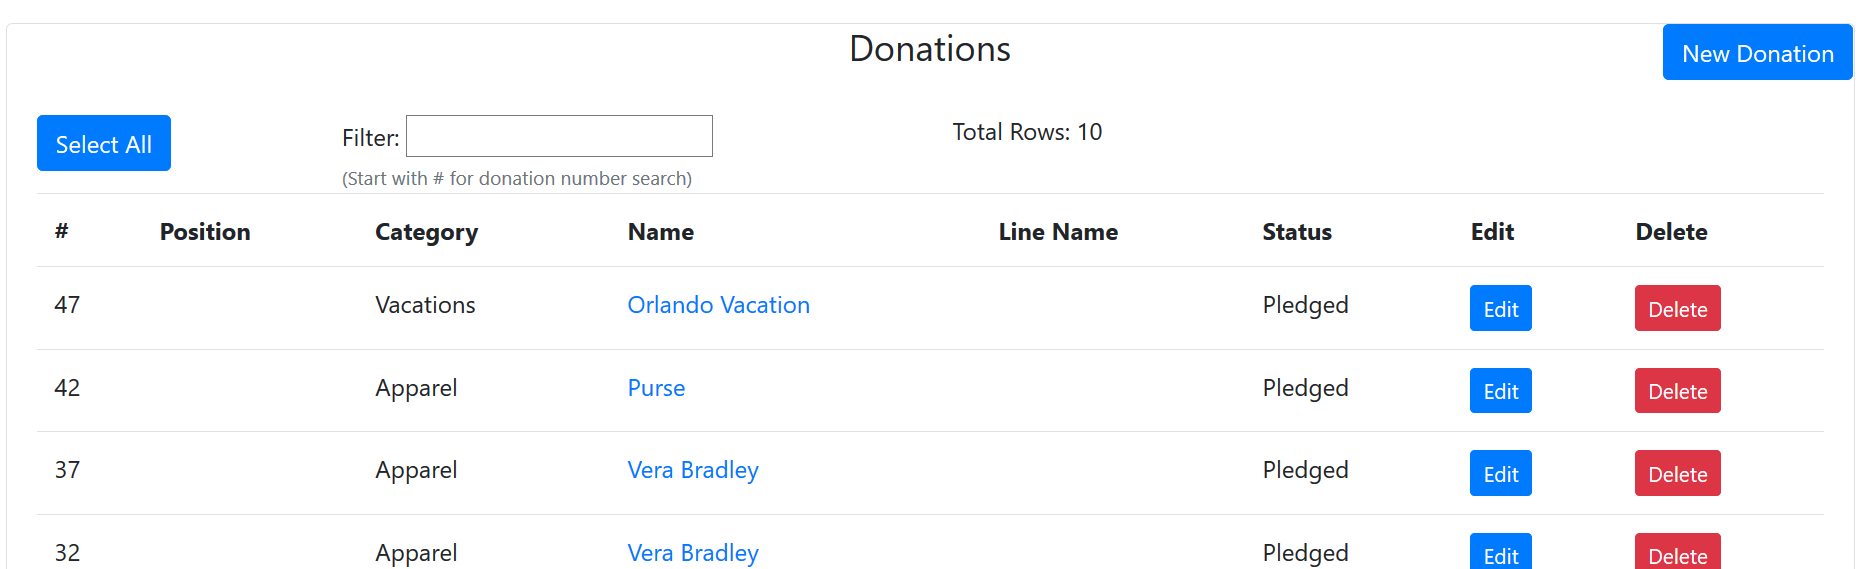
If you need to make any changes to a donation, you will do so through the Donations Page. You will navigate there by selecting the Auction Setup menu and then choose the Donations option. This will bring you to the Donations Page with the list of all current donations.
Start by clicking in the entry box labeled Filter. As you type you will notice that only items with the letters you have typed show in the list. Once you have found the donation you wish to edit, select that item by clicking on the EDIT button for that item. Doing so will bring you to the Update Donation Page where you can make any needed changes.
Once you have completed all the changes that needed to be made, you will click on the UPDATE DONATION button to save the changes and navigate back to the Donations Page.
# Adding a New Category
# The Steps
In order to add or edit categories to your auction, you will first need to navigate to the Categories Page. You do this by clicking on the drop down menu labeled Manage Menu and selecting the Categories option.
To Add a new Category, click on the NEW CATEGORY button. This will take you to the entry page. Click inside the entry box labeled Name and type the Name of your new category. This is intended to be a broad description of the Category such as "Food" or "Toys". Next, press the TAB key to move to, or click in the entry box labeled Description and enter a slightly more detailed description of the category. You may choose to include examples of what would fit into the category as well. For example, if the new category was "Games", you might describe the category as "Board Games, Outdoor Games, Family Games, etc."
After typing in the description, click on the NEW CATEGORY to add the new Category to the Auction Database and navigate back to the Categories Page.
# Editing a Category
# The Steps
Editing a category is very similar to the way you added a new category. First you will navigate to the Categories Page by clicking on the drop down menu labeled Manage and selecting the Categories option. This will bring you to the Categories Page.
Next, find the Category you wish to edit and and click on the EDIT button at the end of it's row. Doing that will take you to the category entry page. Once there, make any necessary changes to either the Name or the Description. Finally, click on the UPDATE CATEGORY button to save the changes and navigate back to the Category Page.
TIP
From the Category Page, you are also able to delete any newly created category that does not have any donations assigned it yet. This would apply if you were adding multiple categories and then decided to merge some of them into a single new category.
# Adding Supporters
As a Donation Coordinator, you may be tasked with adding new Supporters if they are not currently in the database. The Videos and steps below will show you how to do that.
# Adding a New Supporter (Individual)
When Checking a Supporter in, if you cannot find the Supporter in the database, you will need to add them as a New Supporter. Follow the steps below to add them.
# The Steps
The video above will show you how to enter a new Individual Supporter. If you need to enter a new Family, Business or Organization, please see the video below.
If you are not already on the Supporter's page you will navigate there by clicking on the MANAGE menu and selecting the SUPPORTERs option. This will bring you to the Supporter's page.
First, you will search for the Supporter to make sure they are not surrently in the database. You do this by clicking in the Search box and type the Supporter's Last Name. After typing the first four letters of the last name, all supporter's with those letters will appear.
TIP
If the supporter's name does appear, you will want to make sure all the Supporter Information is correct before moving on to the next Supporter. See the tutorial on how to "Edit a Supporter" if there is any information that needs to be updated.
To add the New Supporter, if not found in the search, click on the NEW SUPPORTER button on the right side of the screen.
this will take you to the data entry page. The next step is to click on the drop down menu next to "TYPE" in order to select the type of supporter. In this video we will select Individual from the menu.
Next, type the Supporter's Name into the text box labeled Individual Name. Continue by clicking in the text box next to FIRST and typing in the Supporter's First Name. Then click in the text box next to FAST and type in the Supporter's Last Name.
Now you will add in the rest of the Supporter's information by first clicking on the ADD PHONE button below the First Name. This adds the ability to enter the Supporter's Phone Number. Click on the drop down menu next to "Phone" and choose one of the two options. Then click in the text box and enter the Supporter's Phone Number. There is also an option to receive text messages if the phone number is for a cellular phone. If the Supporter wishes to receive text messages, click in box next to Receive Texts to turn that option on.
TIP
As you are entering the Supporter's information, you can navigate between the entry boxes by using the keyboard's TAB key rather than using the mouse to click in each box.
Continue adding the Supporter's information clicking on the ADD EMAIL button and add the Supporter's email address the same way you added the phone number. Then click on ADD ADDRESS and add the address, City, State and Zip Code by typing in the appropriate entry box.
TIP
You can add multiple phone numbers, email addresses and street addresses (if needed) by clicking on the corresponding ADD button on the screen.
Once you have entered all the correct information, your final step is to click on the CREATE SUPPORTER button. Clicking on that button will add the Supporter to the database and will take you back to the main Supporter's Page.
# Adding a New Supporter (Family/Business/Organization)
# The Steps
If you are not already on the Supporter's Page you will navigate there by clicking on the MANAGE Menu and then selecting the SUPPORTERS option. The first step is to search for the Supporter by typing the Supporter's Name, Business or Organization into the Search box. After typing the first four letters, all supporters with those letters will be displayed.
To add the New Supporter, if not found in the search, click on the NEW SUPPORTER button on the right side of the screen.
This will take you to the data entry page. The next step is to click on the drop down menu next to TYPE in order to select the type of supporter, either Family or Business or Organization, from the menu.
TIP
Family: to be used when there are multiple members of Family or Friends that wish to be tied to the same account.
Business: to be used when the Supporter is a Business, possibly with the Employees wishing to be tied to the same account.
Organization: to be used when the Supporter is an Organization, possibly with Members wishing to be tied to the same account.
Add in the rest of the Family/Business/Organization's information by first clicking on the ADD PHONE button below the Supporter Type selection.. This adds the ability to enter the Supporter's Phone Number. Click on the drop down menu next to Phone and choose one of the two options. Then click in the text box and enter the Supporter's Phone Number. There is also an option to receive text messages if the phone number is for a cellular phone. If the Supporter wishes to receive text messages, click in box next to Receive Texts to turn that option on.
Continue adding the Supporter's information by clicking the appropriate button to add the email and street addresses.
Now you will add the Primary Contact's information by first scrolling down to the entry box labeled First Name and type in the Contact's first name. Then add the Primary Contact's Last Name in the corresponding entry box. Next you will add the phone number by clicking on the ADD PHONE button below the First Name. This adds the ability to enter the Contact's Phone Number. Click on the drop down menu next to Phone and choose one of the two options. Then click in the text box and enter the Contact's Phone Number. There is also an option to receive text messages if the phone number is for a cellular phone. If the Supporter wishes to receive text messages, click in box next to Receive Texts to turn that option on.
Continue adding the Primary Contact's information by clicking the appropriate button to add the email and street addresses.
To add additional Supporters to a Family/Business/Organization, scroll back to the top of the page and click on the ADD PERSON button. This will add another Information Entry set below that of the Primary Contact. Enter the additional Supporter's information the same way as before. You will also notice that there is one more option added to the information set. After entering the additional Supporter's name, click on the drop down menu and select one of the options. While all the options appear in all three instances, for Businesses and Organizations use the options of Employee and Other and for a Family use the options of Spouse, Child or Other.
TIP
Use the selection of OTHER when the additional supporter(s) does not fit into any of the main category types.
Once you have entered all the additional supporters to the Family/Business/Organization, the final step is to click on the CREATE SUPPORTER button. Clicking on the button will add the entry to the database and take you back to the main Supporters Page.